
Part 11: Reusable Prompt Files
Prompt files are a powerful way to create standardized, reusable prompts that can be shared across your team. They help ensure consistency in how you interact with GitHub Copilot and can encode best practices for common tasks like code generation, testing, and documentation.
In this part, you’ll create a reusable prompt file for generating unit tests and use it to add tests to the existing TinyShop.Tests project.
Understanding Prompt Files
Section titled “Understanding Prompt Files”Prompt files are markdown files stored in the .github/prompts folder of your repository. They:
- Can be invoked by name in Copilot Chat
- Are shared with your entire team through source control
- Can include placeholders for dynamic content
- Help standardize common development tasks
Exploring the Test Project
Section titled “Exploring the Test Project”The solution already includes a TinyShop.Tests project with MSTest configured. Let’s take a look at what’s there.
- In Solution Explorer, expand the TinyShop.Tests project.
- Open ProductTests.cs to see the existing reference test.
- Notice the test follows the Arrange-Act-Assert pattern and verifies default values for a new Product instance.
Creating a Unit Test Prompt File
Section titled “Creating a Unit Test Prompt File”Now let’s create a prompt file that helps generate additional unit tests using MSTest.
-
In Solution Explorer we will see the GitHub node from the extension to add it easily:
- Right-Click the GitHub node icon/extension in Visual Studio.
- Choose Add Agent File….
- Select Prompt file… from the dialog.
- Change the file name to
unit-test.prompt.mdand click OK. - The new file will open in the editor; paste the content shown below into the file and save it.
-
If you can create the file manually in file explorer, add a new file named
unit-test.prompt.mdunder.github/promptsand paste the content below. -
Update the prompt file with the following content:
---mode: agentdescription: Generate comprehensive unit tests using MSTest---# Unit Test GeneratorGenerate unit tests for the selected code using the MSTest framework.## Requirements- Use MSTest attributes ([TestClass], [TestMethod], [DataRow])- Follow the Arrange-Act-Assert pattern- Include both positive and negative test cases- Test edge cases and boundary conditions- Use descriptive test method names that explain what is being tested- Mock dependencies where appropriate## Test StructureEach test should:1. Have a clear name following the pattern: `MethodName_Scenario_ExpectedBehavior`2. Include a brief comment explaining the test purpose3. Use proper assertions with meaningful failure messages## ContextGenerate tests for: ${input:Describe what you want to test} -
Save the file.
Using the Reusable Prompt
Section titled “Using the Reusable Prompt”Now let’s use our new prompt file to generate additional unit tests for the Product class.
-
In Copilot Chat, type
/to see available prompt files. -
Select
unit-testfrom the list of available prompts. -
When prompted for input, type:
the Product class in DataEntities, including tests for setting and getting each property, and tests using DataRow for multiple values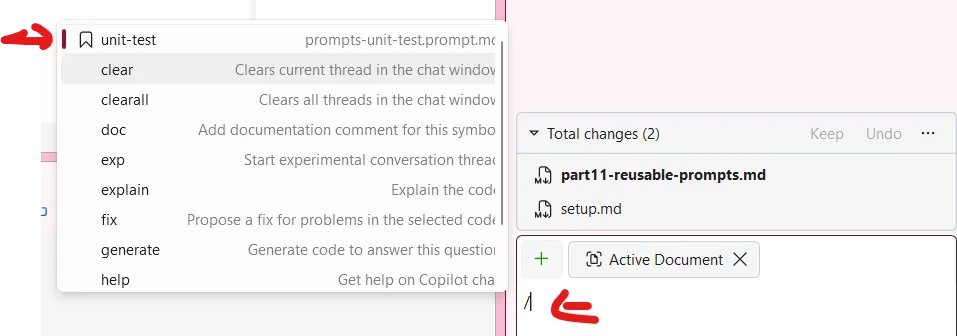
-
Review the generated tests. They should include:
- Tests for each property (Name, Description, Price, ImageUrl)
- Tests using DataRow for parameterized testing
- Proper test method naming following the pattern
- Comments explaining test purposes
Example Generated Tests
Section titled “Example Generated Tests”The generated tests should look similar to:
[TestMethod]public void Name_SetValue_ReturnsExpectedValue(){    // Arrange    var product = new Product();    var expectedName = "Test Product";
    // Act    product.Name = expectedName;
    // Assert    Assert.AreEqual(expectedName, product.Name);}
[TestMethod][DataRow(19.99)][DataRow(0)][DataRow(999.99)]public void Price_SetValue_ReturnsExpectedValue(double price){    // Arrange    var product = new Product();    var expectedPrice = (decimal)price;
    // Act    product.Price = expectedPrice;
    // Assert    Assert.AreEqual(expectedPrice, product.Price);}
[TestMethod][DataRow("product1.png")][DataRow("product2.png")][DataRow("")]public void ImageUrl_SetValue_ReturnsExpectedValue(string imageUrl){    // Arrange    var product = new Product();
    // Act    product.ImageUrl = imageUrl;
    // Assert    Assert.AreEqual(imageUrl, product.ImageUrl);}
Running the Tests
Section titled “Running the Tests”- Open Test Explorer from Test -> Test Explorer.
- Build the solution to discover the tests.
- Click Run All to run all tests including the new generated tests.
- Verify that all tests pass.
Key Takeaway: Reusable prompt files help standardize how your team uses GitHub Copilot. By creating prompts for common tasks like unit testing, you ensure consistency and encode best practices that everyone on the team can benefit from.
Check your understanding
Section titled “Check your understanding”When should a team create a prompt file instead of adding more content to copilot-instructions.md?
Check your answer
copilot-instructions.md should contain durable project guidance that applies to every request. Prompt files are invoked on demand, can target a particular mode, and can accept inputs, making them better for repeatable workflows such as generating tests or scaffolding an endpoint. Keeping task-specific procedures in prompt files prevents the always-on instructions from becoming noisy.
Go deeper: Add repository instructions and prompt files.
Back: Part 10 - Planning Mode in Agent ← | Next: Part 12 - Delegate to the Cloud →