
Workshop Setup
To complete this workshop you will need Visual Studio 2026, the .NET 10 SDK, and a GitHub account with access to GitHub Copilot.
Prerequisites
Section titled “Prerequisites”Before starting, ensure you have:
- Visual Studio 2026 with the GitHub Copilot extension installed
- .NET 10 SDK installed
- GitHub account with one of the following:
- GitHub Copilot Free - Free tier with limited usage
- GitHub Copilot Pro/Pro+/Max - Full access
- GitHub Copilot through your organization
Install .github + MCP Extension
Section titled “Install .github + MCP Extension”Before we begin, let’s install the .github + MCP extension for Visual Studio. This extension provides access to GitHub MCP servers which we will use later in the lab.
- Open Visual Studio 2026
- Go to Extensions -> Manage Extensions
- Search for .github + MCP in the search box
- Click Install on the .github + MCP extension by Mads Kristensen
- Restart Visual Studio if prompted
Sign in to GitHub Copilot
Section titled “Sign in to GitHub Copilot”- Open your browser and go to
https://github.com. - Sign in with your GitHub account or create a new account if you don’t have one.
- Open Visual Studio 2026.
- Select Continue without code. If prompted to sign-in, you can click Close.
- Click the Copilot icon on the top bar (left side next to the search input box).
- Click Sign in to use Copilot.
- A browser window will open prompting you to sign in to GitHub and authorize Visual Studio and Copilot. Complete the sign-in and click Authorize when prompted.
- When the browser shows the confirmation, click Open to return to Visual Studio.
- After setup you should see the GitHub Copilot Walkthrough tab and the Copilot button should be green.
Part 9 creates GitHub issues and Part 12 delegates work to a cloud agent. Both need a repository where you have write access. Fork workshop-tinyshop before those parts. If enterprise policy prevents a fork, you can complete every local exercise but must skip those repository-backed actions.
Select the workshop model
Section titled “Select the workshop model”- Open GitHub Copilot Chat.
- In the model picker at the bottom of the Chat pane, select GPT-5.3 Codex instead of Auto.
- If GPT-5.3 Codex is not listed, select Auto and let a facilitator know. Do not attempt to bypass your organization’s model policy.
Turn on Copilot Settings
Section titled “Turn on Copilot Settings”-
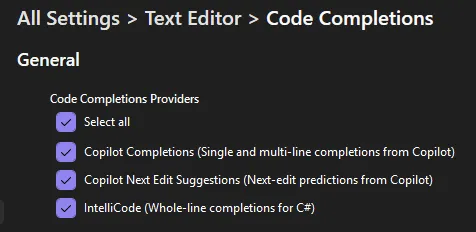
Ensure Code Completions and Next Edit Suggestions are enabled:
- Go to the Code Completions settings in Visual Studio by heading to Tools -> Options -> Text Editor -> Inline Suggestions -> General under Suggestion Providers
- Ensure Copilot Completions is checked.
- Ensure Copilot Next Edit Suggestions is checked.
-
Head to Tools -> Options -> GitHub -> Copilot -> Copilot Chat and ensure the following settings are enabled:
- Enable Agent mode in chat pane
- Enable MCP server integration in agent mode
- Enable Planning
- Enable Ask Question
- Enable View Plan Execution
- Enable Cloud agent (Preview)
- Enable custom instructions
-
Head to Tools -> Options -> GitHub -> Editor and ensure the following settings are enabled:
- Enable AI generated description for auto-inserted documentation comments in support languages
Clone and open the lab solution
Section titled “Clone and open the lab solution”Clone the dedicated TinyShop repository:
git clone https://github.com/jamesmontemagno/workshop-tinyshop.gitcd workshop-tinyshopstart src\TinyShop.sln- In Visual Studio, select File -> Open -> Project/Solution if the solution did not open automatically.
- Open
src/TinyShop.sln.
Start the App
Section titled “Start the App”-
Open the Solution Explorer from the View -> Solution Explorer menu.
-
Set the TinyShop.AppHost as the startup project if it isn’t already by right-clicking on TinyShop.AppHost and selecting Set as Startup Project. Start the project with F5 or Debug -> Start Debugging from the menu.
The Aspire AppHost will start two applications and the Aspire Dashboard:
- The backend .NET app on https://localhost:7130/api/Product
- The frontend Blazor app on https://localhost:7085 - You can see the app by opening that URL from the dashboard
-
Stop debugging and close the application.
Summary and Next Steps
Section titled “Summary and Next Steps”You’ve now set up your environment and cloned the repository you’ll use for the rest of the workshop. The completed branch contains a reference implementation when you need to compare your progress. Let’s start exploring GitHub Copilot!